What makes a good graphic design workflow?
“If you can’t describe what you are doing as a process, you don’t know what you’re doing.” W. Edwards Deming
Design teams are often overwhelmed by requests, each with the due date of ASAP either. From webpage design visuals, event banners, covers, infographics, illustrations, social media posts, you name it, and designers will create it.
In graphic design, a workflow includes all the steps that need to happen for a particular project or task to be completed. In this article, you will find tips for creating the most efficient graphic design workflow.
What is a graphic design workflow?
Workflow is a process of getting from one point to another, step by step. Think of the design process as a map that takes you from point A to point B, a roadmap for a project.
There are several ways to get to where you are going in most cases. Some may have more traffic, others beautiful scenery — but they all take you to your destination. The key is to know the best way to get there, the most productive route.
In the business world, however, you want to get to your destination in the shortest amount of time, using the least amount of fuel and having fun at the same time – which makes your business rewarding, successful, and profitable.
Whatever your result should be, it will determine what the workflow is. In graphic design, the workflow includes all the necessary steps for a particular job or project to be completed.
If you design a part published on the web, it will have a different workflow or process than the one that will end up in the printing press.
The process is similar in most paragraphs, with some minor and significant differences. It is essential to emphasize the difference between creating digital and print visuals because graphic designers do not create UI/UX.
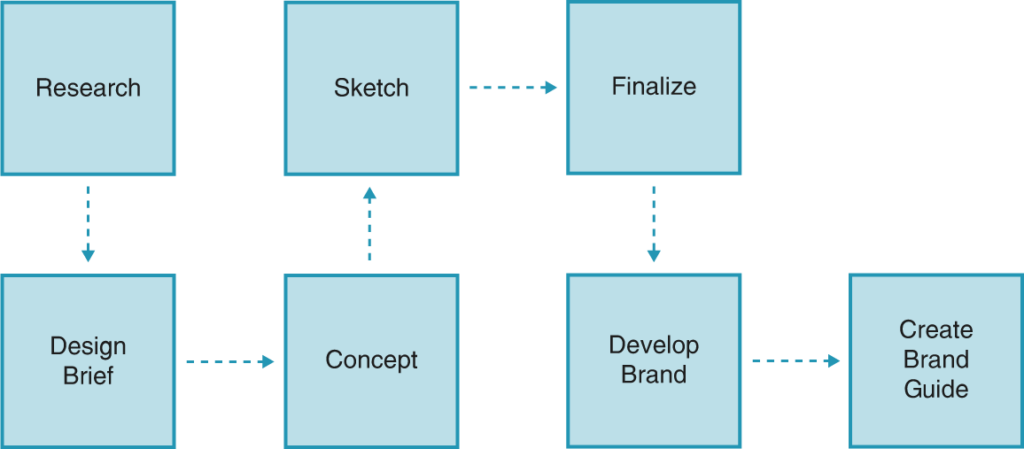
A step-by-step process in a graphic design workflow
Before starting any project, you have to collect detailed information about your client’s needs and wishes, budget, the scope of work, audience, the client’s vision of the design, a mood board, and deadlines.
Using this information, you will be able to develop an outline of the content and goal of the project.
Generally, graphic designers move through a few typical phases in every new project:
01. Researching and gathering information about the project
This is the crucial step to make you a better designer and save you a lot of thinking time.
Including a research phase in your design process will sync your ideas together to answer the brief. Go beyond the surface and get the broader picture of the business, brand value and vision, culture, client industry, and competitors.
Research your competition and see how they’re doing things related to the same topic as yours. Check out their website, social media profiles, and evaluate their strengths and weaknesses to see what you can do better.
Research your client, too, and see how their style has evolved. Check what their old website and logos look like and what they are trying to achieve with the design.
02. Brainstorming creative solutions for the project
Here is how brainstorming looks like from our designer Antonela’s perspective:
Brainstorming is best started as soon as possible after receiving the client’s brief when the information is fresh.
After studying the brief and seeing that we have all the information, that is clear to us what the client expects and what the outcome should be, I look for inspiration (inspirational works, visuals related to the topic I am working on).
For example, if the project is a logo design for a company, I look for inspiration in words related to a given topic, words that describe the emotions that the logo should evoke, and thoughts in my notes. I avoid looking for inspiration by looking at the logos of companies from similar industries because it can lead me in the wrong direction (a logo looking too much like the examples I’ve studied).
It also helps me to play with words when I think. I try to use words that include the spirit, personality, and message I want to convey. For example, suppose a client wants to evoke emotions of security and comfort with the logo. In that case, I will write words or visualize concepts that can produce such feelings.
When something turns out to be a good choice, I sketch ideas that could develop into the whole story. I do quick sketches, nothing fancy. For me, drawing is an ideal way to understand a problem from a different point of view.
They say a picture is worth a thousand words, so thinking through drawing is a fun way to generate new ideas.
If working in a team, you first set aside some time to generate ideas and then present them to the rest of the team. Then you select which idea would be good to develop further.
03. Producing preliminary sketches
Whether you opt to sketch digitally, cardboard, or paper, this is your chance to show off your artistic flair. This stage is all about drawing your designs and seeing what works and what doesn’t.
How to efficiently produce preliminary sketches?
- Use colors when sketching if the idea is better presented in this way.
- Try to reproduce more sketches in as little time as possible, then gradually narrow down the selection by eliminating them.
- Make versions of the same image from different points of view (realism, abstraction).
- Make a sketch in the tool you are most comfortable with, but a personal recommendation is to use paper and pencil for rough and fast sketches.
- Remember that here we do not want anything final and perfect; this is just the beginning of forming an idea visually.
Although some may think that this process is extended and unnecessary, it is significant. It saves a considerable amount of time because if there is a correction or rejection by the client in an early stage, very quickly the idea can be reversed and more straightforward to make new variations.
Pro tip: If you choose a sketch that the client agrees on at this stage, you can quickly develop it without questioning yourself whether the idea may not be what the client expects and the time spent on it. Plus, a client can get involved and additionally complete your concept.
04. Make changes based on clients feedback
It’s time to present everything you have to your client and get ready for their feedback.
Making design changes in response to the client’s feedback is part of the graphic design workflow. The client’s feedback will let you know whether you’re on the right track, so you can push ahead or once again rethink your ideas.
Quick sketches of logo concepts, a handmade version of a package design, layouts showing where elements will be placed on the page, etc., can generate the client feedback.
Don’t take criticism personally – sometimes people will disagree with your designs, but it has nothing to do with you as a person.
05. The final touches
Now it’s time to polish your work and prepare everything to present the final product to the client. Once you’ve completed the handover, await any further correspondence and then wait for the finished product to appear on your client’s website or products.
Every graphic design workflow process is different and tailored to client needs, wishes and design.
When starting any project, the destination seems a million miles away, but putting these steps into practice will successfully guide you towards the finished product.
8 tips for improving your graphic design workflow
Regardless of the experience level, there is always a way to speed up everyday design tasks. It is human nature to look for ways to do things faster and easier. Here are some tips to help you work better, not harder:
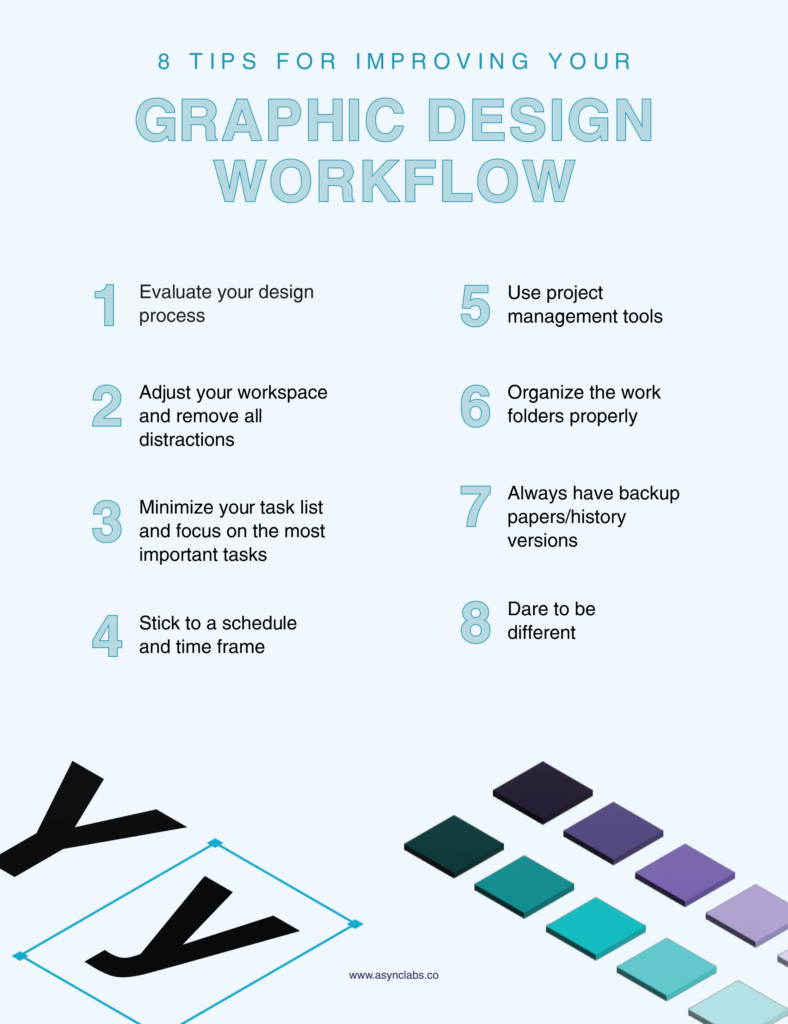
- Evaluate your design process
Evaluate your workflow regularly. A good workflow will speed up the design process and make it more fulfilling and fun.
- Adjust your workspace and remove all distractions
The right environment is crucial for efficient workflow. Focus on one task at a time.
- Minimize your task list and focus on the most important tasks
Always go for a smaller task list and tackle more straightforward tasks together – especially if you have repeating tasks. This way, you won’t have them distract you from the more important ones.
- Stick to a schedule and time frame
A simple and easy way to keep a schedule is to organize your time using a weekly planner. Review your to-do list, and schedule high-priority activities and tasks.
- Use project management tools
Use project management tools like Teamwork or Trello. These software solutions will give you all the tools you need to schedule and track projects, from time tracking, task management to file storage and reporting.
- Organize the work folders properly
Make sure your desktop is clear of digital junk. Delete anything that takes up space and things you don’t need anymore.
- Always have backup papers/history versions
Better safe than sorry. You don’t want to lose any of the ideas and work you’ve done.
- Dare to be different
It is okay to follow trends, but it’s even better to put a twist and add a special touch on design to make it stand out from the crowd and be more recognizable.
Ensure extraordinary results with the graphic design workflow
An excellent graphic design workflow helps you stay organized, collaborate effectively with team members, visualize the result before starting, and make the workflow more efficient. It prevents confusion between the designer and the clients because clients can easily make changes.
With a well-considered workflow, your plans will be firmly in place. This way, you can focus on the actual graphic design work without distractions.
Good luck with your next project! Need help in any aspect of digital design? Let’s talk!